Nx Witness User Manual
Log files track the internal actions performed by Nx Witness components. They are crucial part in the process to help developers to deeply understand the problem and causes.
The following logs may be requested as part of a support ticket:
•System Logs.
•Client Logs.
•Update Logs.
 Note: Desktop Client logs are disabled by default.
To manage log files:
•all: Main Menu -> System Administration > Advanced > Logs Management.
•Client only: Main Menu -> Local Settings > Advanced > Logs Management (does not require to be logged into a System).
Before downloading log files, it is necessary to understand Log Level – the amount of information that the system components record to the log files.
Each component has the following log levels:
•NONE – no log files are written (default for Desktop Client).
•ERROR – only errors and critical failures are written.
•WARNING – warnings (predefined messages from developers), errors, critical failures.
•INFO – same as WARNING plus informational messages predefined by developers (default log level for Servers).
•DEBUG – same as INFO plus auto generated messages about the actions performed by the application (recommended when reporting an issue).
•VERBOSE – same as DEBUG but records full track of everything that the application does (very big amount of data). Slows down the application so definitely not recommended for a long-term run. Might be requested by developers. In this case switch to this log level, collect the log files once the issue is reproduced and switch back immediately after.
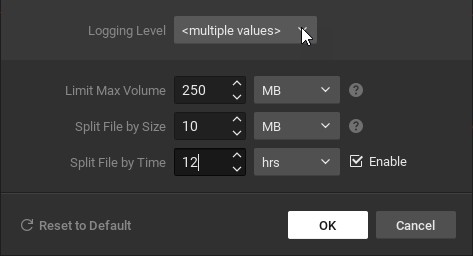
Log level and additional parameters can be configured in Logs Management -> Settings:
•for Client and Server: select the components that you want to configure (It is not possible to configure logs on offline servers) and click Settings.
•for Client only: Click Settings in Local Settings > Advanced > Logs Management.
The following settings can be configured:

•Logging Level – explained above
•Limit Max Volume – the maximum total size of the log files. Once the size hits the limit, the oldest records will be erased.
•Split File by Size – size of the single log file. Once the size hits the limit, the new file will be created until the Max Volume limit is reached by all log files.
•Split File by Time – if enabled, the new file will be created once in a specified period of time (12 hours at the example above) until the Max Volume limit is reached by all log files.
•Reset to Defaults – to revert settings to the original ones.
The changes will be applied once you click OK.
To view Server Logs view in browser, right-click on the desired Server in Resource Panel and choose Server Logs from the context menu. The log will open in a web browser.
To Obtain Server and/or Client Logs
1.Open Logs Management.
2.Select the components that you want to download log files for.
3.Click Download.
4.Choose the folder which will be used to save log files.
To Obtain Client Logs (alternative way)
1.Open Logs Management.
2.Click Download.
3.Choose the folder which will be used to save log files.
Log files are downloaded as zip archives with the following names:
•client_<date> – <time>.zip – client logs
•<server_name> – <server_guid> – <date> – <time>.zip – Server logs (for each Server in the System)
Server logs archive contains the following:
•system_XXX.log – System events (licenses related events Server start/stop, critical issues).
•main_XXX.log – Server events (everything else).