Nx Witness User Manual
The Camera Replacement feature is used to replace an existing camera with another one while allowing the new camera to continue using the original archive. This can be useful for situations where the old camera is broken, an upgrade is needed, or you want to switch camera models from different parts of the building. Camera Replacement is only supported for single-channel cameras and can only be replaced by another single-channel cameras on the same Server. This action can only be initiated by users with administrator or power user permissions.
The feature does not support the following device types:
•Multi-sensor cameras.
•Virtual cameras.
•Speakers.
•NVRs.
•Unauthorized Cameras.
•IO modules.
•Offline cameras that appeared after reindexing the archive.
How to Replace a Camera
1.Make sure the camera to be replaced is disconnected and appears as offline in the system.
2.Right-click the desired offline camera in the Resource Panel.
3.Select the Replace Camera option.
4.Select a camera to replace the current one.
5.Apply changes.
Transferable Data Between Cameras
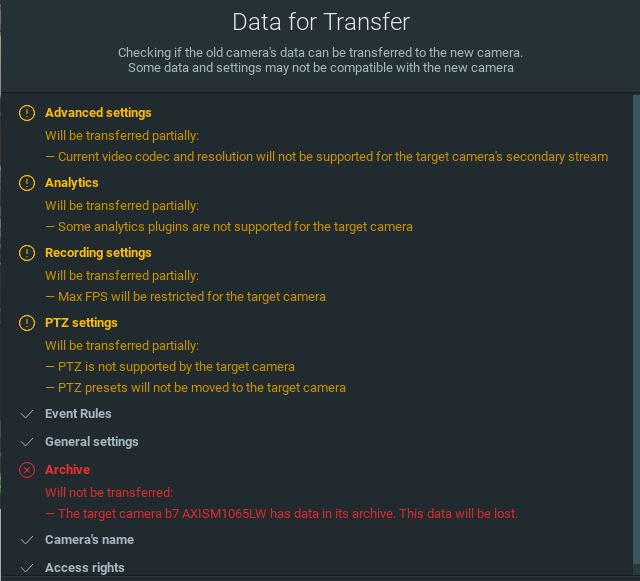
Before the transfer starts, the following dialog will be displayed:

Not all data and settings can be transferred to the new camera as the new camera may have technical limitations. Motion Detection settings and 2-way Audio will not be transferred.
The following data and settings can be transferred:
•Archive.
•Camera’s name.
•Access rights.
•Analytics.
•Event rules.
•PTZ settings.
•General settings.
•Recording settings.
•Advanced settings.
 Note: If the original Camera is reconnected, you will have the option to undo the replacement procedure.