Nx Witness User Manual
If the System is not connected to Nx Cloud (see "Connect your Systems to Nx Cloud"), you will have to connect to a specific Server via its IP Address, Hostname, or a provided Temporary User Link.
To Connect to Specific Server via IP or Hostname:
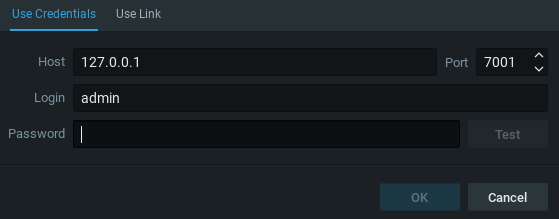
On the Welcome Screen or in the Main Menu, click Connect to Server to open the connection dialog shown below. The Connect to Server dialog enables connecting via an IP Address and the use of different User credentials.
If the operation is canceled, the current User will still be connected to the Server.

The following connection details are required:
•Host – IP Address or address of the computer Server is installed on (localhost or 127.0.0.1 for All-in-One installation).
•Port – IP Port for access to Server (7001 by default).
•Login – Account username used to connect to a server. If connecting for the first time, use "admin" as the login name.
•Password – Account password used to connect to a server. Use the same password that was set up during the initial installation.
•Test – Press this button to check connectivity to a server. The following may cause connection errors:
oServer is not available
oSpecified IP Address is incorrect or inaccessible
oSpecified port is incorrect
oServer is stopped
oLogin and/or password are incorrect
oServer and client are incompatible with each other because they are running different Nx Witness versions. In this case compatibility mode will be suggested.
If the Desktop Client is not connected to a Server, a User can only access Local Files (see “Playing Local Video Files in Nx Witness”).
To Log Out
Open the Main Menu and choose Disconnect from Server.