Nx Witness User Manual
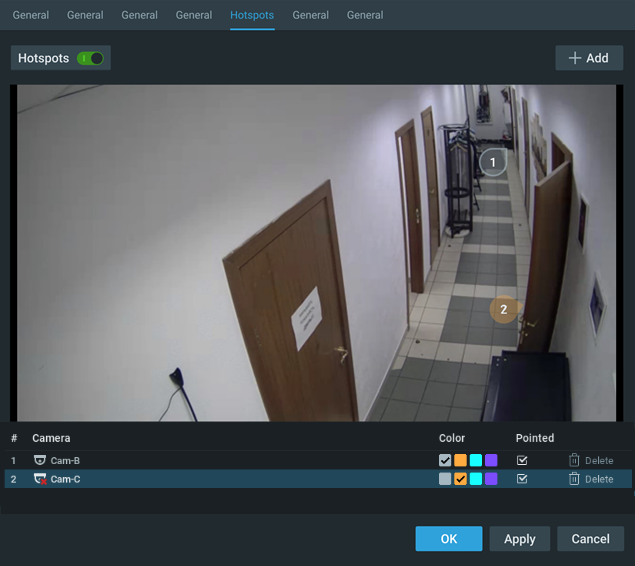
Hotspots are icons layered over the display of a Camera. Each Hotspot icon is linked to another Camera that provides an alternate view of the same area, or is the next Camera to cover the path an object of interest may follow. Viewers can hover their mouse over a Hotspot to see a preview of the linked Camera, or click on the Hotspot to open the linked Camera on the current Viewing Grid or in a new tab/window. This provides an efficient method to follow objects of interest while they travel through doorways, down hallways, or in and out of the view of Cameras.
•Hotspots can be freely positioned over the Camera display and remain in a fixed positions that is not affected by Image Controls or Pan, Tilt, and Zoom Controls.
•Managing Hotspots is limited to Administrators and Power Users, all Users who can View the Camera can toggle the Hotspot overlay on and off (see "Users and Groups").
•Hotspots are disabled by default. They must be enabled for each Camera and after a new Camera has been added to the System (see "Setting Up Cameras and Devices").
•A Camera can have one Hotspot configured for every other Camera in the System. Hotspots can be color coded and set with a directional indicator.
•The Hotspot layer can be toggled per Camera display while the position and visibility of a Hotspot remains unchanged on all other Camera displays.
•Hotspots are functional in the Desktop Client and will not be visible in the Web Admin or Cloud Portal.
 IMPORTANT: Using PTZ controls to change the position of a Camera can affect the accuracy of the Hotspot as Hotspots do not track Camera movements.
To Add or Edit a Hotspot using the Desktop Client
1.Open Camera Settings by doing one of the follow:
•Main Menu > System Administration > Camera List and double click a Camera.
•Open Camera Settings... using the context menu on the Viewing Grid or a Camera name in the Resources Panel.
2.Switch to the Hotspots tab in the Camera Settings dialog.
3.Ensure Hotspots are enabled for the Camera by checking the toggle.
4.Click the Add button and the next sequential Hotspot number is added to the center of the Camera display.
5.Drag the Hotspot to any location on the Camera display; select a Hotspot color and rotate the optional pointer.
6.In the list of Hotspots, click any Hotspot labeled Select Camera... to link a Camera to the Hotspot using the search and selection dialog.
7.Apply changes to remain in the Hotspot dialog or click OK to apply settings and exit the Camera Settings dialog.
 Note: All created Hotspots that are not linked to a Camera will be removed when the Hotspot dialog is closed.

Using Hotspots
1.If not displayed, toggle the Hotspot layer using Keyboard Shortcut ("H") or by Clicking the Hotspot icon in the display title bar.
2.Mouse-hover over a Hotspot to see a preview of the linked Camera.
3.Click on the Hotspot to open the linked Camera on the Viewing Grid.
4.Right-click the Hotspot to open the Hotspot context menu.
•Open Camera (on Viewing Grid).
•Open Camera in a New Tab.
•Open Camera in place (of the Camera displaying the Hotspot).
To Delete a Hotspot using the Desktop Client
1.Open Camera Settings by doing one of the follow:
•Main Menu > System Administration > Camera List and double click a Camera.
•Open Camera Settings... using the context menu on the Viewing Grid or a Camera name in Resources Panel.
2.Change to the Hotspots tab in the Camera Settings dialog.
3.Remove Hotspots using the Delete icon in the list of Hotspots.
 IMPORTANT: Deleted Hotspots cannot be restored.