Nx Witness User Manual
Enabled Users can access the System according to their Permissions while a Disabled User is prevented from accessing the System by any method. Unlike Deleting a User, Disabling a User preserves existing User information in the database and the User can again be Enabled with previous Permissions and settings unchanged.
•Administrators and Power Users can Enable or Disable User in the Desktop Client, Web Admin, and Cloud Portal.
•Power Users cannot Enable or Disable Administrators or other Power Users.
•The Audit Trail of User Actions retains all entries for Disabled Users.
•Disabled Users will be disconnected from the System and Email notifications will stop.
•Layouts created or shared by Disabled Users will remain available to other users.
Enabling and Disabling Users in the Desktop Client
1.Open the User Management dialog by selecting Main Menu > User Management dialog and switching to the Users tab.
•Optionally refine the list of users by using the search box, filters, and column sorting options.
2.To disable or enable a single User:
•Click on the User name in the list, or a select a single checkbox and Click Edit to open User Properties.
•Change the toggle to Enabled (Green) or Disabled (Gray).
3.To Enable or Disable enable multiple Users at once:
•Select the checkbox next to each User to Enable or Disable.
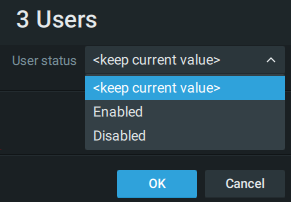
•Click the Edit button to open the multiple User Enable or Disable dialog.
•Choose if all selected Users are to be Enabled or Disabled.

4.Click OK to Apply changes. Authentication may be required. Disabled Users will be disconnected from the System.
Disabling and Enabling Users using the Web Admin / Cloud Portal
1.Select Settings in the page header menu.
2.Expand Users in the left panel menu.
3.Select a User to display User Properties.
4.Change the toggle to Enabled (Green) or Disabled (Red).
5.Click Save to Apply changes. Authentication may be required.
 IMPORTANT: Disabled User will be disconnected from the System.